Unveiling the Decadence: What Are Millionaire Shortbread?
Imagine a dessert so rich, so satisfying, it tastes like a million bucks. That's precisely the promise and delicious reality of
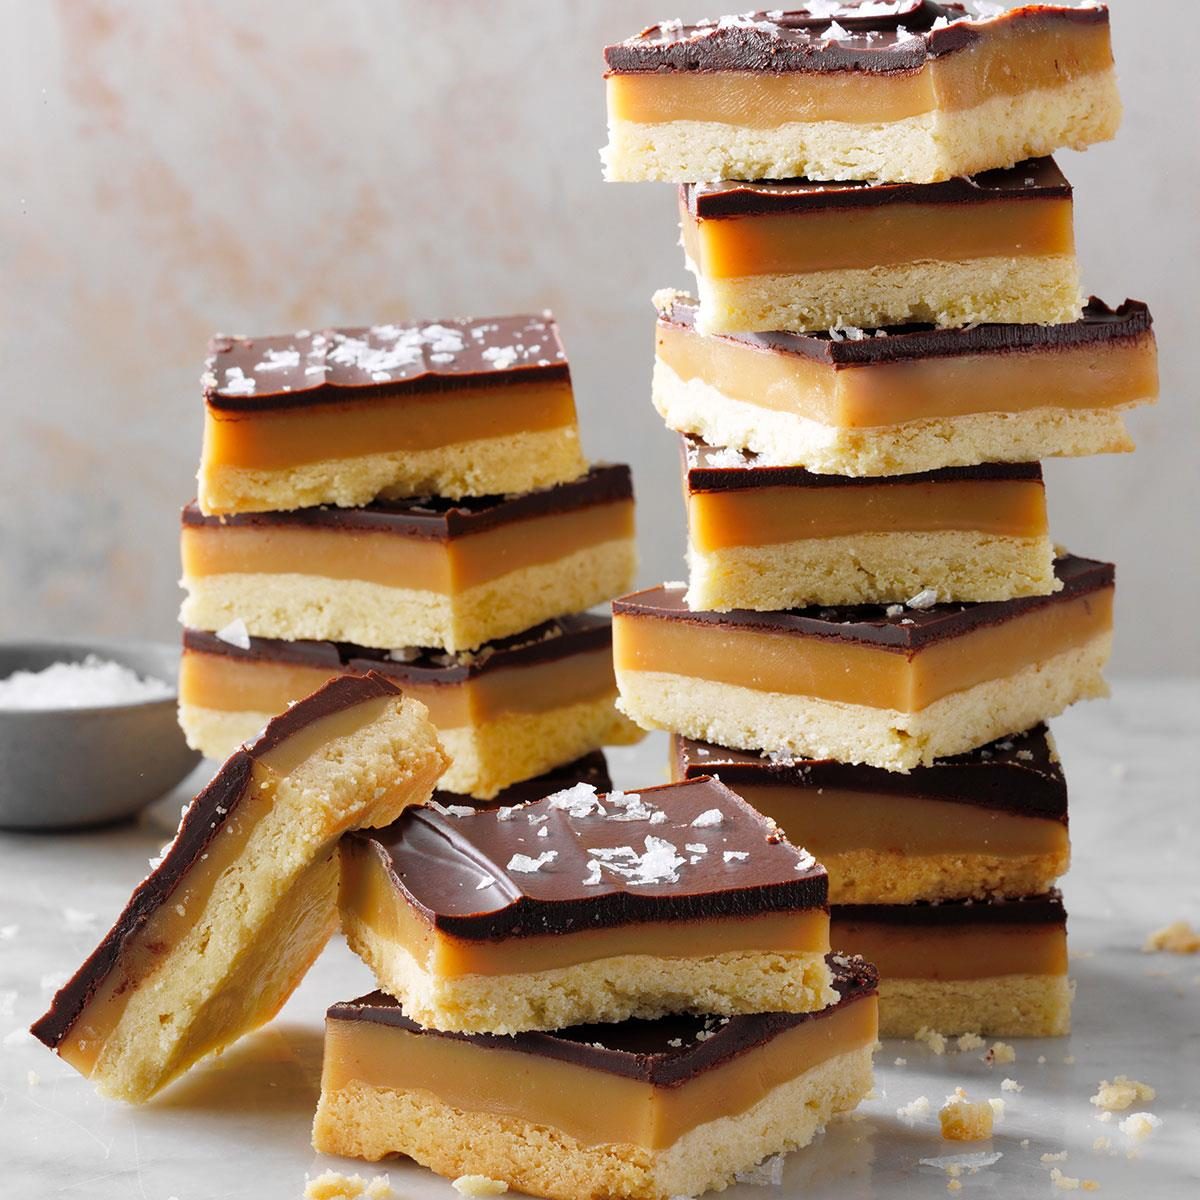
Perfect Millionaire Shortbread, often simply called Millionaire Bars. This iconic treat is a symphony of textures and flavors, typically featuring three decadent layers: a buttery shortbread base, a luscious, chewy caramel filling, and a snappy chocolate topping. It's a showstopper dessert that, despite its sophisticated appearance, is surprisingly accessible for the home baker.
Originating from Britain, with Scottish shortbread roots dating back to the 12th century, the innovative combination of shortbread, soft caramel, and firm chocolate is a more modern, 20th-century culinary marvel. The allure of this dessert isn't just in its taste; it’s in the anticipation of biting through those distinct, perfectly balanced layers. Whether you're a seasoned baker or just starting, mastering a great millionaire bars recipe is a truly rewarding experience, transforming simple pantry ingredients into something truly extraordinary.
Crafting the Perfect Layers: A Step-by-Step Millionaire Bars Recipe
Creating the ultimate millionaire bars recipe is all about precision and patience, allowing each layer to shine and set properly. Here’s how to build your masterpiece from the ground up.
Preparation is Key
Before you even start mixing, ensure your pan is ready. A 9x9-inch square baking pan is ideal. Line it with parchment paper, allowing the edges to hang over the sides. This thoughtful step will be your best friend when it comes to effortlessly lifting the entire slab of Millionaire Bars out of the pan for clean, easy slicing. If using foil, grease it well to prevent sticking.
Layer 1: The Buttery Shortbread Base
The foundation of any good Millionaire Shortbread is, naturally, the shortbread. This isn't just any cookie; it's a thick, buttery crust that provides the perfect counterpoint to the sweet layers above.
- Ingredients: A classic shortbread calls for minimal ingredients: all-purpose flour, cold butter (cut into cubes), and granulated sugar. Sometimes a pinch of salt is added to enhance the butter flavor.
- Mixing: Combine the flour, sugar, and salt (if using). Cut in the cold butter using a pastry blender, your fingertips, or a food processor until the mixture resembles coarse crumbs. Be careful not to overwork the dough; excessive handling can develop the gluten and make the shortbread tough instead of tender.
- Pressing & Baking: Press the crumbly shortbread mixture firmly and evenly into the prepared pan. Use the back of a spoon or your hands to ensure it’s compact and smooth. This compaction is crucial for a stable base. Bake in a preheated oven (usually around 350°F / 175°C) until lightly golden brown, typically 20-25 minutes.
- Cooling: Allow the shortbread crust to cool completely in the pan on a wire rack. This step is non-negotiable – a warm base will melt your caramel.
Layer 2: The Velvety Caramel Core
The caramel layer is often considered the most intimidating, but with a few simple tips, it's incredibly achievable. This layer provides that signature chewy, sweet goodness.
- Classic Caramel Ingredients: For a homemade caramel, you'll need sweetened condensed milk, butter, and corn syrup (which helps prevent crystallization and adds to the chewiness).
- The Process: Combine these ingredients in a medium saucepan over low to medium-low heat. The key here is *patience* and *constant stirring*. Whisk frequently, almost constantly, to ensure the sugars melt smoothly and evenly, preventing scorching at the bottom of the pan. Continue cooking until the mixture thickens and turns a rich golden-brown color. This usually takes 10-15 minutes or until it reaches the soft-ball stage (235-245°F / 112-118°C) if you're using a candy thermometer. If you’re looking for a simpler approach, check out our guide on Easy Millionaire Bars Recipe: Decadent Dessert Made Simple.
- No-Bake Caramel Variation: For a quick, no-bake alternative often found in some millionaire bars recipe variations, melt pre-packaged caramels with a splash of cream and butter over low heat until smooth. For added texture and a salty edge, you can even stir in crispy cereal and roasted peanuts, as some recipes suggest. This variation creates a different, yet equally delicious, chewy texture. To delve deeper into the differences, explore our comparison of No-Bake vs. Classic Millionaire Bars: Choose Your Decadent Treat.
- Spreading & Setting: Once the caramel is ready, pour it evenly over the cooled shortbread base. Gently spread it to the edges. Again, allow this layer to cool and set completely before proceeding. Rushing this step will cause your chocolate layer to melt into the caramel, ruining the distinct layers. You can pop it in the fridge for an hour or two to speed this up.
Layer 3: The Snappy Chocolate Topping
The final layer seals the deal, offering a delightful snap and rich chocolate flavor.
- Chocolate Choice: While milk chocolate is an option, many enthusiasts, including us, recommend using good quality semi-sweet chocolate chips or chopped chocolate bars. The slight bitterness of semi-sweet chocolate provides a beautiful balance against the sweetness of the caramel and shortbread, truly elevating this millionaire bars recipe. Dark chocolate can be used for an even more intense flavor, if preferred.
- Melting: Melt the chocolate using a double boiler or, more conveniently, in a microwave. If using a microwave, heat in short bursts (30 seconds at a time), stirring well after each burst, until smooth and fully melted. Overheating chocolate can cause it to seize or burn, so go slow.
- Finishing Touch: Pour the melted chocolate over the cooled caramel layer. Gently spread it with an offset spatula to create an even, glossy surface.
- The Essential Sprinkle: Immediately after spreading the chocolate, sprinkle generously with flaky sea salt. This is a non-negotiable step that we'll elaborate on shortly!
- Final Chill: Chill the bars until the chocolate is completely set, which typically takes about 2 hours in the refrigerator.
The Secret Sauce: Why Salt and Quality Ingredients Matter
Don't skip the salt! This isn't just a suggestion; it's a vital component that transforms a good millionaire bars recipe into an exceptional one. A generous sprinkling of flaky sea salt on top of the wet chocolate layer is essential. It provides a crucial contrast, cutting through the richness and sweetness of the caramel and chocolate, making all the flavors pop and leaving a delightful salted caramel note on your palate.
Beyond salt, the quality of your core ingredients truly makes a difference. Using real butter in your shortbread, high-quality sweetened condensed milk for your caramel, and a premium semi-sweet chocolate for your topping will yield a far superior result compared to using generic alternatives. These simple, basic pantry ingredients, when chosen well, are the building blocks of perfection.
Pro Tips & Creative Twists for Your Millionaire Bars
Making millionaire bars is already a journey, but here are some insights to perfect your craft and even add your personal touch:
- Patience with Cooling: We've said it before, but it bears repeating: allow *each layer* to cool and set completely before adding the next. This ensures clean, distinct layers and prevents the dessert from becoming a melded mess.
- Slicing for Perfection: Once fully chilled and set, remove the slab from the pan using the parchment paper overhang. For super clean cuts, use a large, sharp knife, warming it slightly under hot water and wiping it dry between each slice. Press down firmly and steadily rather than sawing.
- Storage: Millionaire Bars keep beautifully! Store them in an airtight container in the refrigerator for up to 5 days. They can also be frozen for longer storage (up to 2-3 months), making them an excellent prep-ahead treat for future indulgence.
- Creative Toppings: While flaky sea salt is paramount, don't shy away from experimenting. Swirl melted white chocolate on top for a marbled effect, sprinkle with chopped roasted nuts (like sliced almonds or pecans), or add a dusting of cocoa powder for an extra layer of chocolatey depth.
- Troubleshooting Caramel: If your caramel is too soft, you likely didn't cook it long enough. If it's too hard, it may have been cooked too long or at too high a temperature. Practice makes perfect!
Conclusion
Millionaire Shortbread, or Millionaire Bars, truly lives up to its name, offering a taste of luxurious indulgence with every bite. The combination of crumbly shortbread, soft, chewy caramel, and snappy chocolate, all accentuated by the essential flaky sea salt, creates a dessert that is impossible to resist. While it may look complex, by following this comprehensive millionaire bars recipe and embracing a few key techniques, you'll find that crafting these decadent layers at home is not only achievable but immensely satisfying. So go ahead, don your imaginary preposterous fluffy robe, and treat yourself to one of the all-time favorite desserts – you've earned it!